- Our initial job project serves as a simple demonstration of fundamental concepts. We’ll configure a job to create a new file in the home directory, containing the ubiquitous phrase “Hello World”.

- Begin by navigating to the dashboard and selecting “New Item”. Provide a descriptive name for the job, such as “hello_world”. Choose the “Freestyle project” option and proceed by clicking the enabled “OK” button to access the configuration page.
- Utilize the description field to furnish a brief summary of the job’s purpose. For instance, “Generate a file containing the phrase Hello World”.
- For now, disregard the remaining options. Additional functionalities will become available as you install plugins in subsequent steps. Let’s now focus on the “build” section.
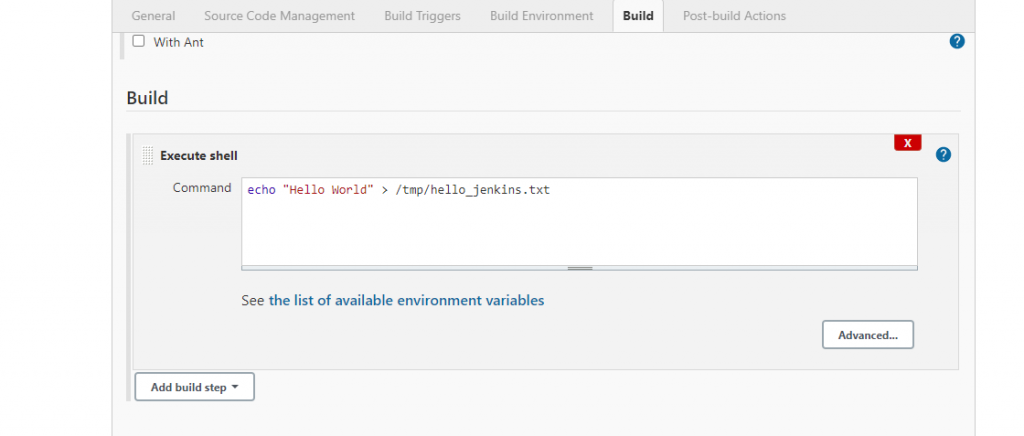
- Click on “Add build step” and opt for “Execute shell”.
- Within the provided text box, input the following command:
echo "Hello World" > /tmp/hello_jenkins.txt.

- If necessary, additional build steps can be appended by utilizing the “Add build step” button. However, for this example, a single step suffices.
- Upon saving the configuration, the job will execute. Return to the shell interface and enter the command
cat /tmp/hello_jenkins.txtto view the “Hello World” output.


Embarking on your journey with Jenkins involves setting up your first job project. This initial task serves as a practical demonstration, guiding you through the process of configuring a job to perform a simple action: creating a file with the phrase “Hello World”. By following these steps, you’ll gain a foundational understanding of how Jenkins operates and how to execute basic tasks within its framework.


