E‑commerce backends power the online stores we all use daily — handling user accounts, products, shopping carts, and orders. If you’re a backend developer or learning Python and APIs, a modular architecture can make your code clean, scalable, and easier to maintain. That’s exactly what the Flask Store API – Modular E‑Commerce Backend project delivers. This open‑source repository offers a RESTful backend built with Flask that handles authentication, product and cart management, and orders, all structured in a modular way.
In this post, you’ll learn what this project is, explore the technology stack behind it, and follow a practical step‑by‑step tutorial to run it locally on your machine.
What Is the Flask Store API?
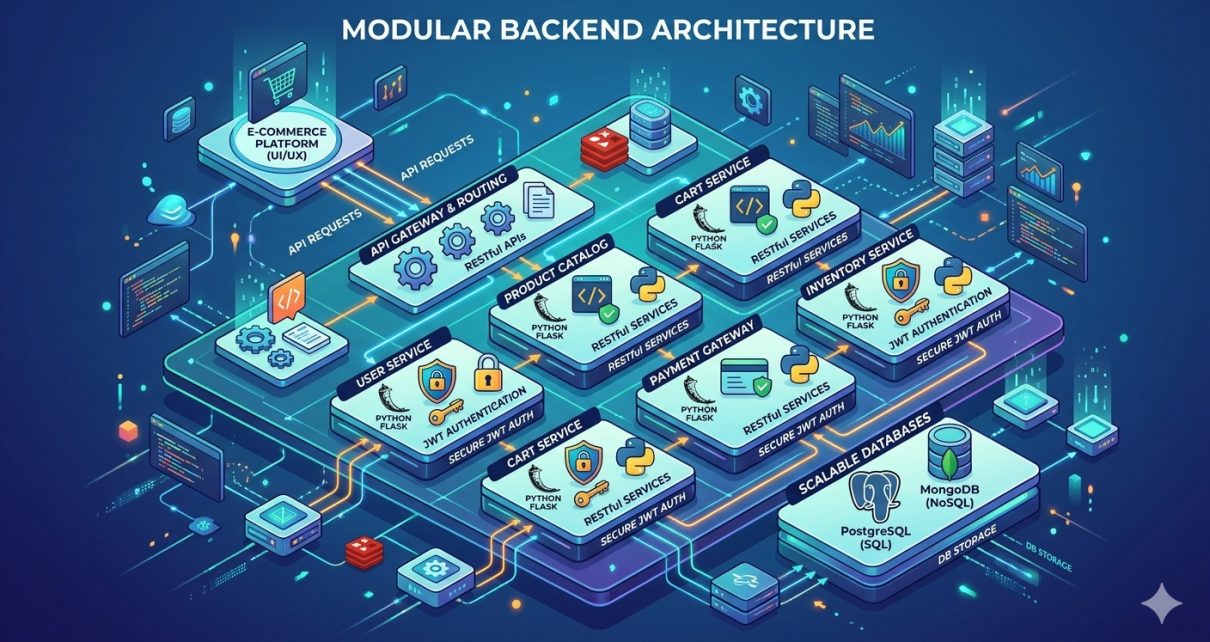
The Flask Store API – Modular E‑Commerce Backend is a backend application that provides a modular REST API for managing a simple online store. It’s designed using best practices for RESTful APIs:
- Modular project structure with separate components for users, products, carts, and orders.
- JWT‑based user authentication for secure logins.
- Full CRUD operations for products, carts, and orders.
- Swagger documentation via Flask‑RESTX so you can easily explore the API.
- Uses SQLAlchemy ORM for relational database interactions.
- Includes test cases to validate functionality.
This makes it a solid foundation for building a real e‑commerce backend or integrating with a frontend (like React or Vue).
Technologies Used
This project is built using a combination of popular Python backend libraries and tools:
✅ Python & Flask – The core backend framework.
✅ Flask‑RESTX – Helps build REST APIs and auto‑generates Swagger documentation.
✅ Flask‑SQLAlchemy – ORM for database interactions.
✅ Flask‑JWT‑Extended – Handles authentication using JSON Web Tokens.
✅ Marshmallow – Serialization and validation library.
✅ Flask‑Migrate – Database migrations support.
✅ SQLite (default) – Lightweight relational database (can be replaced with PostgreSQL or MySQL).
✅ Pytest – Test framework.
Collectively, these technologies help you build a robust, secure, and scalable backend that developers can extend into full e‑commerce platforms.
Why Modular Architecture Matters
A modular codebase splits features into independent components (e.g., users, products, carts). This provides multiple benefits:
- Clear organization: Each domain lives in its own module.
- Ease of maintenance: Bugs and feature updates stay isolated.
- Scalability: New features can be added without disrupting existing logic.
- Separation of concerns: Each module has a single focus, which improves readability.
The repository follows this structure precisely, with clearly defined directories like app/ and tests/, making it ideal for both learning and production use.
Step‑by‑Step Guide to Use This Project
Follow these steps to run the project locally and start interacting with your own e‑commerce backend.
1. Clone the Repository
Open your terminal or Git Bash and run:
git clone https://github.com/sf-co/3-flask-store-api-modular-e-commerce-backend.git
cd 3-flask-store-api-modular-e-commerce-backend
This gets the source code on your local machine.
2. Create and Activate a Virtual Environment
Using a virtual environment keeps your dependencies isolated:
python -m venv venv
source venv/bin/activate  # macOS / Linux
venv\Scripts\activate  # Windows
3. Install Dependencies
Now install all required packages:
pip install --upgrade pip
pip install -r requirements.txt
This loads all libraries the project depends on, including Flask and SQLAlchemy.
4. Configure the Environment (Optional)
The project defaults to SQLite. If you plan to use another database (like PostgreSQL), update your configuration variables accordingly in the config.py or environment variables.
5. Run Database Migrations
If the project includes migration scripts, initialize the database:
flask db init
flask db migrate -m "Initial migration"
flask db upgrade
This builds your database schema based on models defined in the code.
6. Start the Server
Once everything is set up:
python run.py
This will launch the Flask application locally (usually at http://localhost:5000). You should see your API running and ready to process requests.
7. Test the API Endpoints
Most endpoints are documented via Swagger (Flask‑RESTX integration). Navigate to:
http://localhost:5000/api/docs
There you’ll find interactive documentation — try out endpoints for login, product listing, cart management, and order operations.
8. Run Unit Tests
Quality code has tests! To verify everything works:
pytest -v
This runs the test suite included in the tests/ directory and verifies your setup.
Conclusion
The Flask Store API – Modular E‑Commerce Backend is an excellent starter backend for anyone building a scalable e‑commerce platform. With modular code organization, JWT authentication, database abstraction, and auto‑generated API docs, this repository can save you time and help you focus on your unique business logic.
Whether you’re integrating this backend with a modern frontend or exploring backend development, this project provides a clean foundation to grow from. Clone it today, explore its features, and make it your own!