
Backend developers and Python enthusiasts — imagine having a ready‑to‑extend, RESTful blogging platform API that you can use to power a blog frontend, mobile app, or admin interface. That’s exactly what the FlaskBlog API offers. Built with Python’s lightweight Flask framework, this project provides secure user authentication (JWT), complete CRUD operations for users, posts, and comments, and a modular, scalable codebase you can adapt for real world apps.
In this post, we’ll walk through what this API does, the technologies it uses, and, most importantly, how you can run and use this project locally step by step. This is perfect for learning Flask APIs or for kickstarting your own blogging platform backend.
What the Project Is
The FlaskBlog API is a backend service built with Flask that implements:
- RESTful endpoints for users, blog posts, and comments
- JWT authentication (login, access token)
- Database management via SQLAlchemy
- Secure route protection for sensitive actions
- JSON responses for frontend/mobile consumption
It’s intended as a backend API — meaning it doesn’t include a frontend UI, but instead exposes JSON endpoints that any front‑end client could interact with (e.g., React, Vue, Flutter, or even Postman).
Technologies Used
This project leverages several well‑known Python & Flask tools:
🔹 Python – the programming language powering the backend.
🔹 Flask – a lightweight Python micro‑framework for web apps.
🔹 Flask‑JWT‑Extended – handles JSON Web Token authentication.
🔹 Flask‑Migrate – database migrations backed by SQLAlchemy.
🔹 SQLAlchemy ORM – Python ORM for database operations.
🔹 SQLite – default relational database (configurable to PostgreSQL, MySQL, etc.)
🔹 Docker & Docker‑Compose – optional containerization for easy deployment.
Why Build With Flask?
Flask is beloved for backend APIs because it’s:
✔ Lightweight and flexible
✔ Easy to learn and extend
✔ Compatible with many extensions
✔ Perfect for microservices and prototypes
By building this blogging API in Flask, you get a clean, modular foundation without the boilerplate and complexity of larger frameworks.
Step‑By‑Step Setup Guide
Here’s how to get this project running on your computer:
1️⃣ Clone the Repository
Open your terminal or command prompt and run:
git clone https://github.com/sf-co/2-flask-flaskblog-api-flask-based-blogging-platform.git
cd 2-flask-flaskblog-api-flask-based-blogging-platform
This creates a local copy of the project files.
2️⃣ Create a Python Virtual Environment
Create and activate an isolated Python environment:
Windows:
python -m venv venv
venv\Scripts\activate
macOS/Linux:
python3 -m venv venv
source venv/bin/activate
A virtual environment keeps project dependencies separate from your global Python setup.
3️⃣ Install Dependencies
Install the required Python packages with pip:
pip install -r requirements.txt
This will pull in Flask, SQLAlchemy, JWT extensions, and others defined in the requirements.txt file.
4️⃣ Configure Environment Variables
Copy the sample environment file and tweak any settings:
cp .env-example .env
Set keys like:
SECRET_KEY="your-secret"
JWT_SECRET_KEY="another-secret"
DATABASE_URL="sqlite:///blog.db"
Use secure keys in production.
5️⃣ Initialize Your Database
Before starting the server, create the database and apply migrations:
flask db init
flask db migrate -m "Initial DB"
flask db upgrade
This sets up your tables for users, posts, and comments.
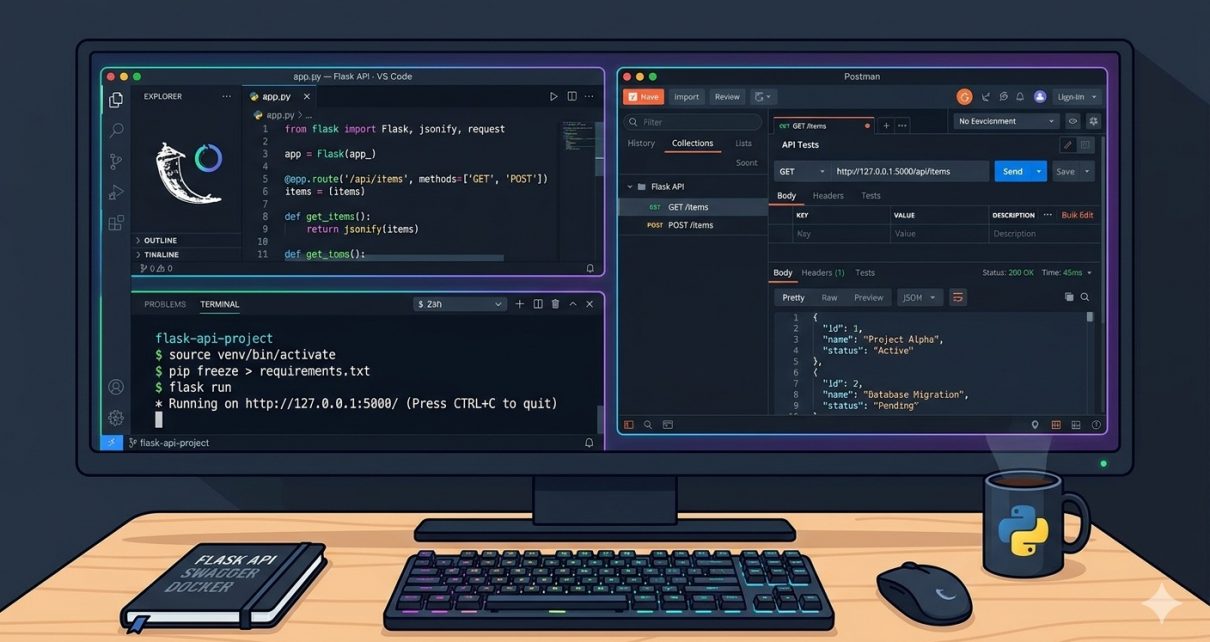
6️⃣ Run the Development Server
Start your Flask app with:
flask --app run.py run
Your API will be live at:
http://localhost:5000
How to Use the API
Now let’s explore the API endpoints and how to interact with them.
🔐 User Authentication
Register a user:
POST /api/auth/register
Body example:
{
  "username": "alice",
  "password": "securepassword"
}
Login to get JWT:
POST /api/auth/login
Body example:
{
  "username": "alice",
  "password": "securepassword"
}
On success, you’ll receive an access token — use this for protected routes.
📝 Blog Posts Endpoints
Create a new post
POST /api/posts
Headers:
Authorization: Bearer <JWT_TOKEN>
Body example:
{
  "title": "My First Blog Post",
  "content": "This is my first post!"
}
Get all blog posts
GET /api/posts
This returns a list of posts in JSON.
Get a specific post by ID
GET /api/posts/{post_id}
Update a post (protected)
PUT /api/posts/{post_id}
Delete a post (protected)
DELETE /api/posts/{post_id}
💬 Comments Endpoints
Similarly, you can manage comments:
POST /api/posts/{post_id}/comments— add a commentGET /api/posts/{post_id}/comments— list commentsDELETE /api/comments/{comment_id}— remove one
All protected routes require the logged‑in user’s JWT token.
Running with Docker
If you prefer containers, this project includes a Dockerfile and docker‑compose.yml. Follow these commands:
docker compose build
docker compose up -d
Your API will again be available at http://localhost:5000 — ideal for testing or deploying to the cloud.
Wrapping Up
With this API, you’re ready to build full‑scale blogging applications. Connect it to a frontend (React, Next.js, Flutter), add user roles, or extend it with features like:
⚡ Tags and categories
⚡ Uploadable images
⚡ Pagination
⚡ Search/filtering
⚡ Admin dashboards
Flask gives you the freedom to grow. 🚀
Feel free to explore the code on GitHub, customize it, and drop a ⭐ if you use it in your projects!